Information
Authors: B. M. Whitley, J. G. Speer, R. L. Cryderman, R. C. Goldstein, K. O. Findley and D. K. Matlock
Location/Venue: Thermec 2016 Graz, Austria
Keywords: thermomechanical processing, microalloy, austenite conditioning, induction hardening, physical simulation, hot torsion, prior austenite grain size
Abstract
Three AISI 1045 steels: a base steel, one modified with vanadium (V), and one modified with V and niobium (Nb) were studied to evaluate microstructural conditioning prior to induction hardening. Simulated bar rolling histories were evaluated using fixed-end hot torsion tests with a Gleeble® 3500. The effects of chemical composition and thermomechanical treatment on final microstructures were examined through analysis of laboratory simulations of steel bar rolling and induction hardening processes in order to provide additional insights into the morphological evolution of austenite of microalloyed steels. Analysis of prior austenite grain size (PAGS) is complemented with analysis of austenite recrystallization and pancaking during rolling. The potential for utilizing TMP, in conjunction with microalloy additions, to enhance bar steel microstructures and subsequent performance is assessed by evaluating the induction hardening response of each steel systematically processed with different preconditioning treatments.
Introduction
Thermomechanical processing (TMP) of microalloyed steels has been shown to produce refined final microstructures by austenite grain boundary pinning and elevation of the austenite no-recrystallization temperature (TNR) [1-7]. Both phenomena lead to refinement of as-rolled microstructures, potentially influencing subsequent heat treating response. While TMP has been widely implemented in sheet and plate steel products, rapid processing speeds and other factors associated with bar steel processing have precluded its widespread implementation in current bar production [8]. This study examines the effects of chemical composition and thermal and thermomechanical processing variations in preconditioning steel bars for subsequent induction hardening in order to refine PAGs for improved fracture toughness and fatigue life.
Experimental Methods
Three induction-hardenable grades of medium carbon (1045) steel, with compositions shown in Table 1, were evaluated. These included a base alloy containing aluminum (1045 Al), an alloy microalloyed with vanadium (10V45), and a vanadium plus niobiumalloy (10V45 Nb).
| Alloy | C | Mn | Si | Cr | Mo | Ti | Nb | V | Al | N |
|---|---|---|---|---|---|---|---|---|---|---|
| 1045 Al | 0.45 | 0.72 | 0.24 | 0.12 | 0.04 | 0.001 | 0.001 | 0.003 | 0.021 | 0.0097 |
| 10V45 | 0.45 | 0.82 | 0.28 | 0.15 | 0.03 | 0.001 | 0.001 | 0.084 | 0.000 | 0.0127 |
| 10V45 Nb | 0.46 | 0.85 | 0.27 | 0.14 | 0.03 | 0.001 | 0.020 | 0.092 | 0.000 | 0.0124 |
In order to assess the austenite condition after an industrial bar rolling process, specimens of each experimental material were processed through a multi-step hot torsion simulation using a Gleeble® 3500 thermomechanical simulator. The thermomechanical simulation was designed to recreate the metallurgical conditions experienced by steels during industrial bar rolling. Accordingly, the pass strain, strain rate, interpass time, and thermal profiles were simulated using hot torsion. Prior to deformaion processing, each simulation began with a 20 minute hold at 1200°C to solutionize all microalloy elements. The roll-pass simulation consisted of a series of eight roughing passes at 120°C followed by two different finishing sequences: a series designed to simulate conventional hot rolling (HR) with deformation at 1000°C; and a TMP simulation with controlled rolling at 800°C (below TNR).
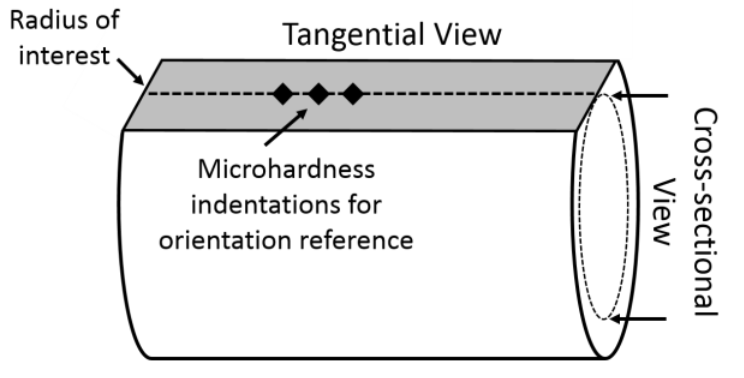
The austenite microstrucures present at the end of each rolling sequence were analyzed on samples immediately quenched to room temperature using compressed helium. The sampling method outlined in a recent study, and shown schematically in Fig. 1, was employed for this study [10]. The method utilizes tangential sections to observe austenite pancaking and cross-sectional views for austenite grain size where grains appear approximately equiaxed. All samples were etched with a saturated picric acid solution to reveal prior austenite grain boundaries in quenched samples, and prior austenite grain sizes were measured using a concentric circle intercept method [10].
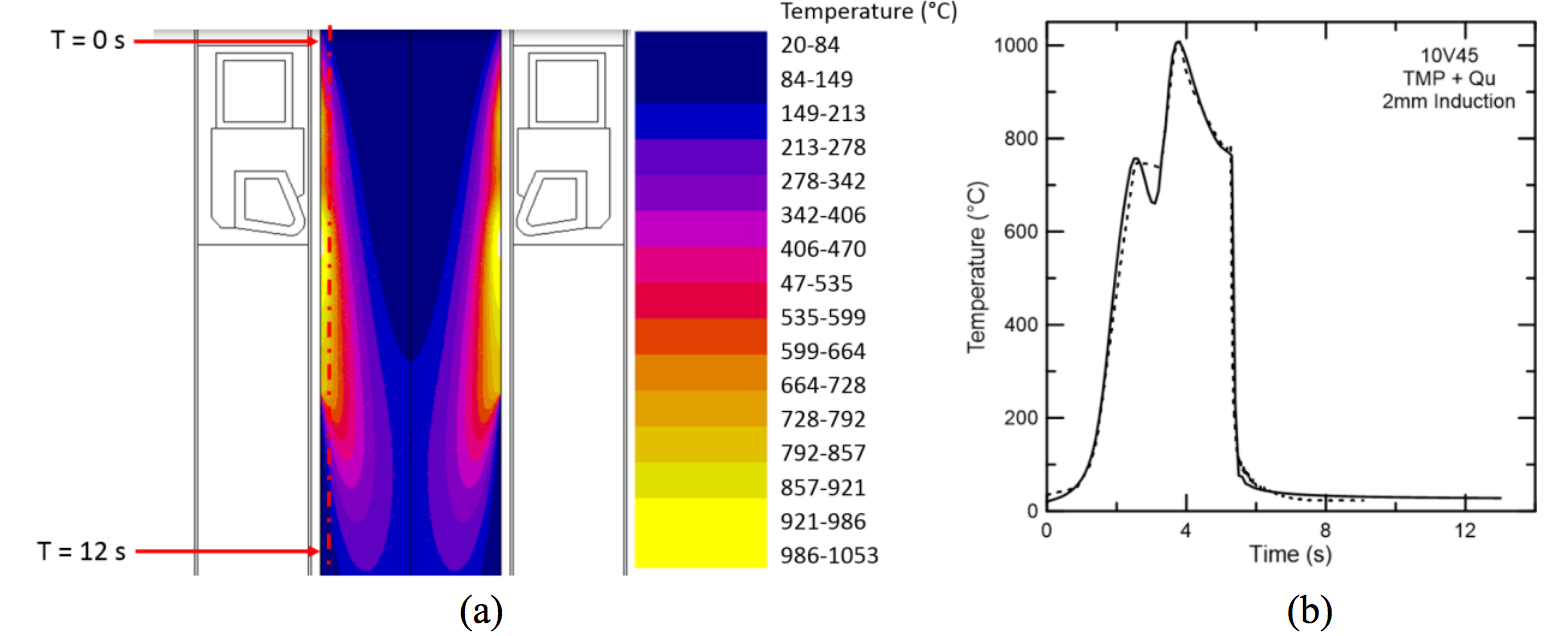
Resistive heating in a Gleeble® 3500 was utilized to simulate the heating rates, hold times, and quench rates incurred at the near-surface region of 38 mm diameter bars during an induction hardening process. Products of this size are typically induction scan hardened, a method where the part moves relative to the induction coil and quench head. The specimen dimensions used in hot torsion simulation (7.2 mm diameter) precluded the use of induction processing following torsion experimentation. In order to accurately recreate the thermal history during induction scan hardening, the induction process was modeled using a 2D coupled electromagnetic and thermal Finite Element Method (FEM) program, Flux2D. In the model, the inductor and quench head move, relative to the bar. A linear bar speed of 20 mm/s was used, with a target case depth of 2 mm. A non-linear heat transfer coefficient was utilized to simulate a water spray quench, and radial symmetry in 3D was assumed. The model was based on an industrially-available 2-turn induction coil with a flux concentrator for use in a scan hardening operation. The results of this model, along with accompanying experimental data are presented in the following section.
Results & Discussion
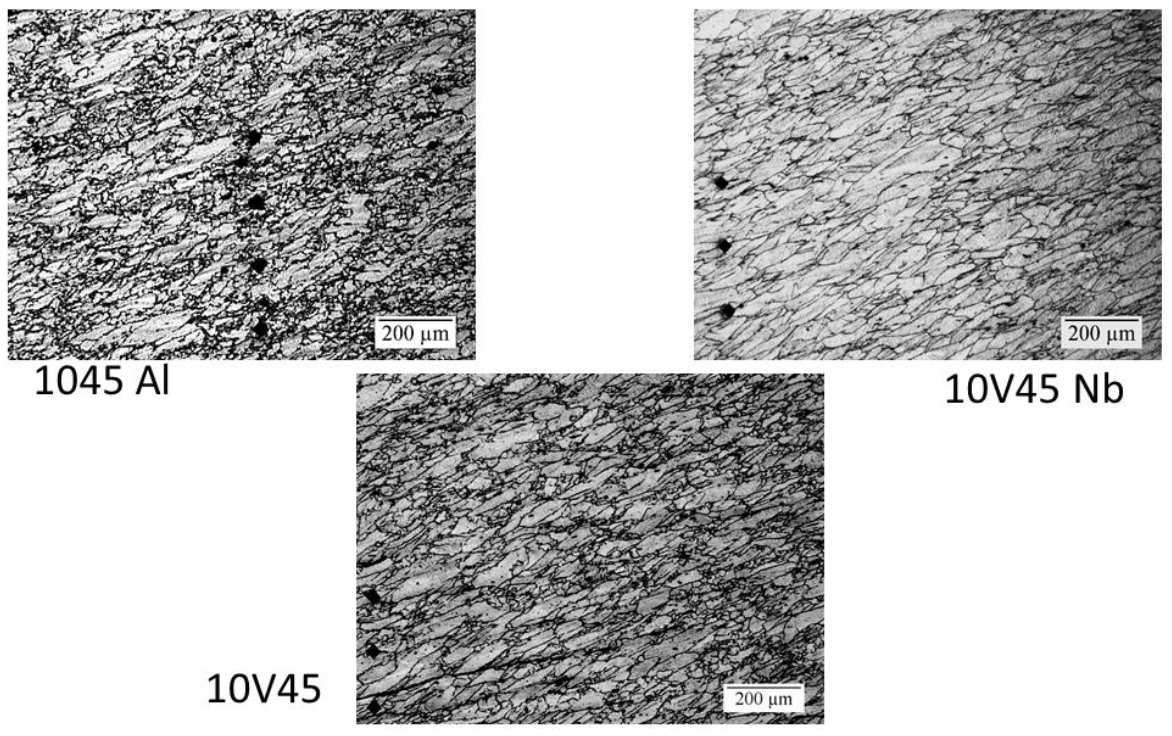
The austenite morphology present at the end of rolling was examined due to its implications for subsequent phase transformation behavior. Specimens were processed through simulated bar rolling in hot torsion and immediately quenched to room temperature. Steels deformed in the HR condition allowed for recrystallization and growth of equiaxed austenite grains. Rolling at the lower finishing temperature (TMP condition) resulted in final microstructures consisting of highly deformed austenite grains, as shown in Fig. 2, which are marked by pancaked austenite grains with varying fractions of recrystallization. While additions of vanadium and niobium suppressed austenite recrystallization during rolling, the levels of accumulated shear strain within the unrecrystallized austenite remained largely unchanged, as indicated by grains of similar aspect ratios and angles of inclination (with respect to the torsional axis, which is vertical in all micrographs) [9].
The modeled thermal profile for a 38 mm bar undergoing a scan-hardening process is presented in Fig. 3a. The near-surface thermal history is presented as a solid line in Fig. 3b along with a dashed line which shows the imposed experimental profile measured on a sample during induction simulation on a Gleeble. The state of austenite following induction hardening was evaluated in each alloy for HR and TMP pre-conditions. The prior austenite grain structures of all specimens were examined in the cross-sectional orientation for grain size analysis, and representative micrographs of each condition are presented in Fig. 4. During reheating of quenched (martensitic) steels to temperatures above Ac1, microstructural features such as martensite packet boundaries, block boundaries, and prior austenite grain boundaries can act as preferential sites for heterogeneous ausenite nucleation. The character of each of these microstructural features is expected to be refined by austenite conditioning [11].
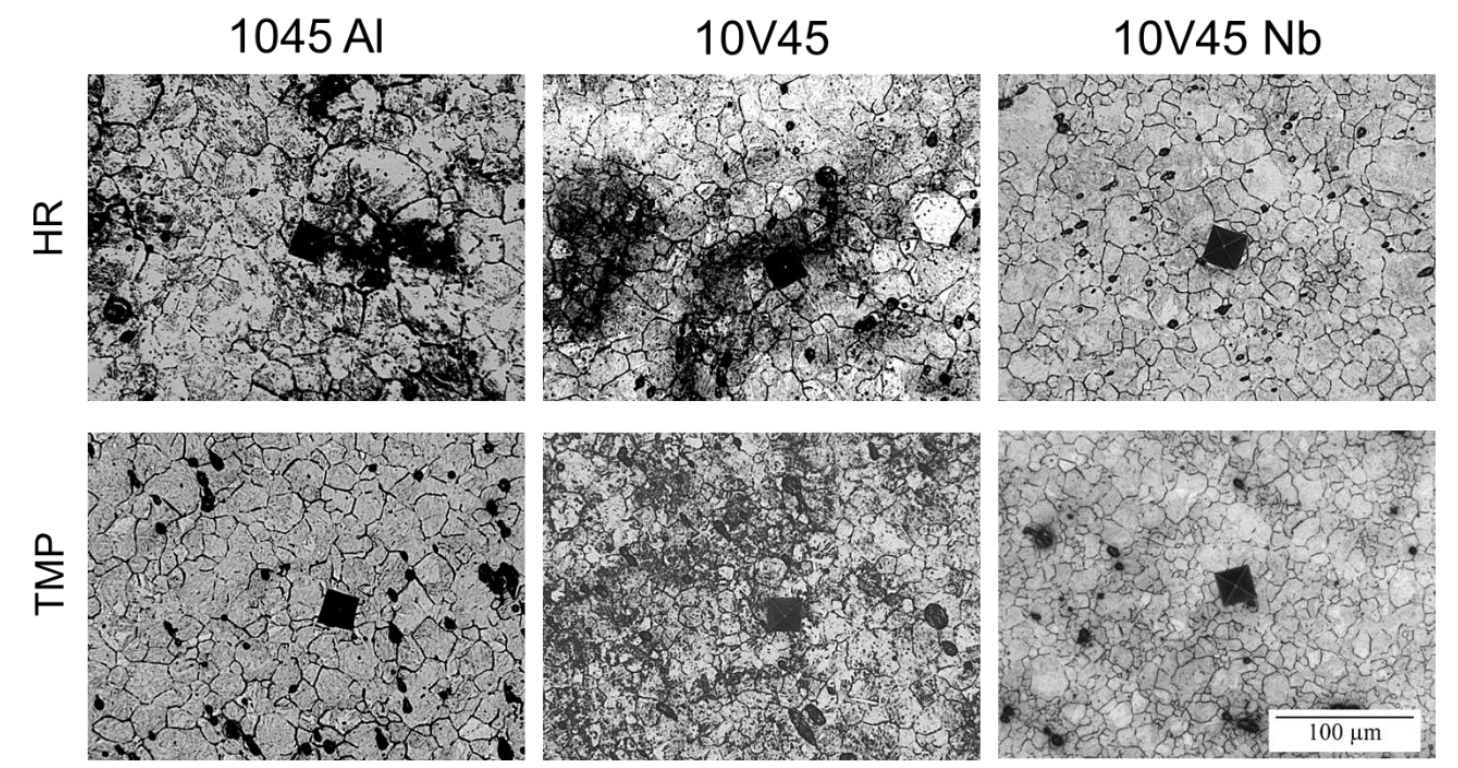
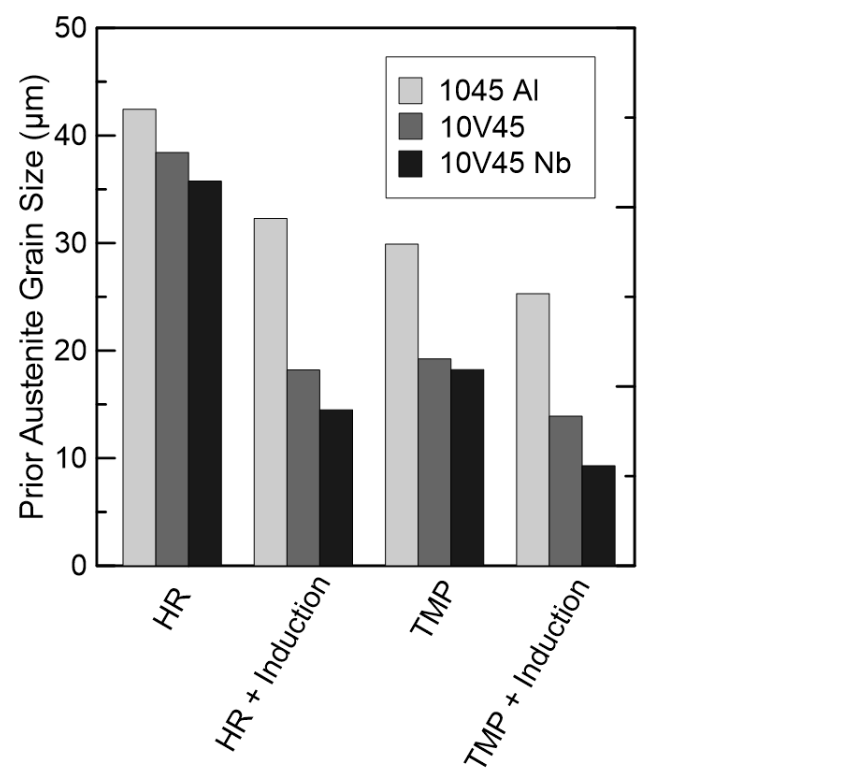
A comparison of prior austenite grain sizes for experimental steels following both rolling simulation and rolling simulation + induction hardening simulation is presented in Fig. 5, where the effects of microalloy additions, lower temperature rolling, and induction hardening are shown graphically. The following trends in prior austenite grain size are observed:
- In every condition, the following trend is observed in order of decreasing PAGS: 1045 Al, 10V45, 10V45 Nb.
- Prior processing at the lower finishing temperature (TMP) is seen to refine the austenitic grain size before induction hardening for every experimental alloy. Refinements on the order of 10-20 microns were observed, which correlate to 30-50% reductions after TMP.
- Induction hardening results in further refinement of PAGS for every alloy and starting condition. For the HR starting condition, PAGs refinement of 10-20 microns results from the induction hardening process (25-60% refinement); thus resulting in similar austenite grain sizes as the TMP rolled and direct quenched condition prior to induction processing. For steels in the TMP condition, additional PAGS refinement of 4-9 microns is observed after induction hardening.
- Refined starting microstructures resulted in more refined final prior austenite grain sizes after induction hardening in every condition. This trend is attributed to a greater density of nucleation sites for austenite formation in conditions composed of finer pre-induction processed microstructures.
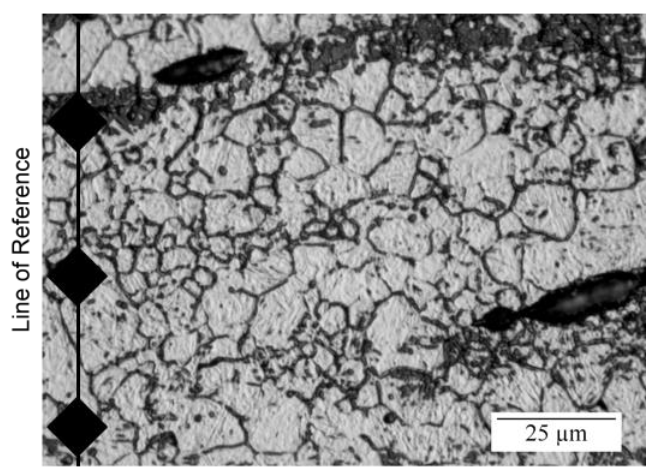
Light optical microgrtaphs taken on tangential views were used to confirm that the initially pancaked PAGs produced during TMP rolling would result in austenite grains of equiaxed morphology following the rapid reaustenitization process of induction hardening. A representative micrograph in the tangential orientation is given in Fig. 6, where refined, equiaxed prior austenite grains are observed alongside elongated manganese sulfide inclusions. Equiaxed PAGs were observed in the tangential view of all specimens following induction hardening simulation, confirming that the pancaked morphology of prior austenite grains was not preserved after the induction hardening process.
Conclusions
Austenite evolution has been evaluated during simulated bar rolling under two finishing conditions, and the effects of microalloying and subsequent induction hardening have been examined through analysis of prior austenite grain sizes and morphologies. Additions of microalloyed V and Nb, rolling at lower finishing temperatures, and induction processing were all observed to refine the austenite grain size. When implemented in combination, these factors are observed to refine prior austenite grain size from more than 40 microns to less than 10 microns. This refinement in austenite grain size holds promise for improving the mechanical response of bars following induction hardening.
Acknowledgements
The authors acknowledge the support of the corporate sponsors of the Advanced Steel Processing and Products Research Center, an industry/university cooperative research center at the Colorado School of Mines.
References
[1] S. K. Dhua, D. Mukerjee, and D. S. Sarma, “Influence of Thermomechanical Treatments on the Microstructure and Mechanical Properties of HSLA-100 Steel Plates,” Metall. Mater. Trans. A, vol. 34A, pp. 241-253, 2003.
[2] R. Barbosa, F. Boratto, S. Yue, and J. J. Jonas, “The Influence of Chemical Composition on the Recrystallisation Behaviour of Microalloyed Steels,” Process. Microstruct. Prop. HSLA Steels, pp. 51–61, 1988.
[3] P. Gong, E. J. Palmiere, and W. M. Rainforth, “Dissolution and Precipitation Behaviour in Steels Microalloyed with Niobium During Thermomechanical Processing,” Acta Mater., vol. 97, pp. 392–403, 2015.
[4] J. G. Speer and S. S. Hansen, “Austenite Recrystallization and Carbonitride Precipitation in Niobium Microalloyed Steels,” Metall. Trans. A, vol. 20, pp. 25–38, 1989.
[5] R. D. Doherty, D. A. Hughes, F. J. Humphreys, J. J. Jonas, D. Juul Jensen, M. E. Kassner, W. E. King, T. R. McNelley, H. J. McQueen, and A. D. Rollett, “Current Issues in Recrystallization: A Review,” Mater. Today, vol. 1, pp. 219–274, 1998.
[6] L. Sun, K. Muszka, B. P. Wynne, and E. J. Palmiere, “Influence of Strain History and Cooling Rate on the Austenite Decomposition Behavior and Phase Transformation Products in a Microalloyed Steel,” Metall. Mater. Trans. A, vol. 45, pp. 3619–3630, 2014.
[7] J. Biglou and J. Lenard, “A Study of Dynamic Recrystallization During Hot Rolling of Microalloyed Steels,” CIRP Ann. Technol., vol. 45, no. 1, pp. 227–230, 1996.
[8] D. K. Matlock and J. G. Speer, “Microalloying Concepts and Application in Long Products,” Mater. Sci. Technol., vol. 25, no. 9, pp. 1118–1125, 2009.
[9] B. Whitley, A. Araujo, J. G. Speer, K. Findley, and D. K. Matlock, “Analysis of Microstructure in Hot Torsion Simulation,” ASTM Mater. Perform. Charact., vol. 4, no. 3, pp. 307-321, 2015.
[10] ASTM E112-12, “Standard Test Methods for Determining Average Grain Size,” ASTM Int., pp. 1–27, 2013.
[11] A. A. Barani, F. Li, P. Romano, D. Ponge, and D. Raabe, “Design of High-strength Steels by Microalloying and Thermomechanical Treatment,” Mater. Sci. Eng. A, vol. 463, pp. 138–146, 2007.
If you have more questions, require service or just need general information, we are here to help.
Our knowledgeable Customer Service team is available during business hours to answer your questions in regard to Fluxtrol product, pricing, ordering and other information. If you have technical questions about induction heating, material properties, our engineering and educational services, please contact our experts by phone, e-mail or mail.
Fluxtrol Inc.
1388 Atlantic Boulevard,
Auburn Hills, MI 48326
Telephone: +1-800-224-5522
Outside USA: 1-248-393-2000
FAX: +1-248-393-0277